Currency


Installation Tips for Stainless Steel Hasps
February 28, 2026

Installation Tips for Stainless Steel Hasps
Installing that new hasp seems simple, but the difference between a flimsy lock and a truly secure one is all in the details. A poorly mounted hasp can often be pried off in under a minute, but getting a rock-solid fit is easy. It all starts with gathering the five essential tools for the job, which ensures perfect alignment and prevents frustrating mistakes like splitting wood or stripping screws.
Before you begin, a simple pencil is your most important tool for marking precise hole locations. While a screwdriver works, a power drill is highly recommended to prevent stripped screw heads. The real secret is using a drill bit that’s slightly narrower than your screws. This creates a “pilot hole”—a perfect path that guides the screw in straight and keeps the wood from cracking. Here’s your full toolkit:
Hasp and staple set
Power drill & Phillips head bit
Drill bit (slightly smaller than your screws)
Pencil
Tape measure
The Secret to a Smooth-Closing Hasp: Perfect Alignment in 4 Simple Steps
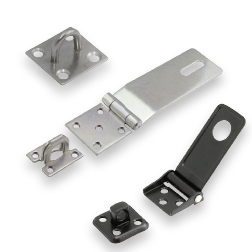
The single biggest mistake when installing a hasp is getting it crooked, resulting in a lock that’s frustrating to close. The secret to a perfect fit is to do all your positioning with the door or lid shut. First, close the door so it’s sitting exactly where it will be when locked. Place the main hinged part of the hasp on the door and the staple—that’s the U-shaped loop the padlock goes through—on the frame. Now for the most important part: fold the hasp over the staple and give it a little jiggle. Does it move smoothly without catching? This is how you find the sweet spot for a flawless, non-binding fit.
Once you’ve found that perfect position, do not move anything. Holding both pieces firmly in place with one hand, use your pencil to carefully mark the center of every single screw hole on both the hasp and the staple. Marking all of them at once, without shifting the pieces, locks in your perfect alignment. This simple step is the key to avoiding a crooked installation and ensures your padlock will click shut effortlessly every time. With your holes marked, you’re ready to drill.
Drill, Drive, Secure: The Right Way to Fasten Your Hasp Without Splitting the Wood
With your pencil marks as a guide, the next step is to pre-drill your pilot holes. This is your absolute best insurance against splitting the wood or snapping a screw head off—one of the most common hasp installation mistakes. Choose a drill bit that is slightly smaller than the screw’s shaft and drill a straight hole on each mark. This creates a perfect, clean path for the screw to follow, ensuring a tight grip without damaging the door or frame.
To ensure that alignment stays perfect, always attach the main hinged part of the hasp first. Secure it to the door using your freshly drilled pilot holes. Before touching the second piece, swing the hasp shut one last time to confirm it still lines up perfectly with the pencil marks for the staple. This quick double-check prevents any nasty surprises and is the secret to a frustration-free, step-by-step hasp fitting guide. Once confirmed, you can confidently attach the staple to the frame.
Finally, drive your screws in until they are snug and the hasp sits firmly against the wood. It’s tempting to use a power drill on full blast, but overtightening is a major pitfall. Too much force can strip the wood inside the hole—making it useless for reinforcement—or even break the screw. A snug fit is all you need for a solid installation.
Security Upgrade: Why You Should Ditch the Screws in the Box
Your hasp is on, but let's address a common security blind spot: the screws that came in the package. While convenient, they are often too short and can be removed by any thief with a basic screwdriver. Worse, short screws can be ripped out of the wood with a single, well-placed pry bar, rendering your strong stainless steel hasp and expensive padlock completely useless. The lock is only as strong as what holds it to the door.
For a simple but powerful security boost, spend a few extra dollars at the hardware store on one-way screws. Just as the name suggests, you can drive them in with a standard flat-head screwdriver, but their unique head design makes them almost impossible to turn counter-clockwise to remove. This one small change instantly defeats any attempt to quickly and quietly unscrew your hasp, adding a significant layer of protection.
When you need the highest level of security for something like a shed door or main gate, upgrade to carriage bolts. These bolts go all the way through the wood and are fastened with a washer and a nut on the inside. With the smooth, rounded head on the outside and the nut secured on the inside, there is simply nothing for a thief to grip or unscrew. This method makes your hasp a permanent, inseparable part of the door itself.
One-Minute Maintenance for a Lifetime of Use
You chose stainless steel because it’s tough and corrosion-resistant, but even the best materials need a little TLC. Over time, the hinge is a natural collection point for dust and grit. This buildup can make the hasp stiff to operate and, over many years, can cause abrasive wear on the moving parts, even on high-quality, corrosion-resistant steel.
Thankfully, keeping it operating like new is simple. Once or twice a year, just wipe the hasp clean and apply a single drop of household oil (like 3-in-One) or a quick spray of lubricant directly into the hinge mechanism. This tiny bit of maintenance flushes out any grit and ensures a smooth, easy motion for years to come, keeping your hasp ready for action.
Your Secure Project is Just a Padlock Away
What might have seemed like a tricky job is now complete, and you did it right. By taking the time to align the pieces before marking, pre-drilling your holes, and using quality screws, you’ve installed more than just a steel hasp lock. You have created a clean, professional finish with rock-solid security, avoiding the common pitfalls of split wood and crooked hardware that frustrate so many.
Your new stainless steel padlock hasp is only half of the solution. The final, rewarding step is choosing a padlock for your hasp that matches its strength. You no longer just see a lock and some screws; you now see a complete security system you built with confidence, ready to protect what matters.
Recent Posts
-
Heavy Duty Hasps: Security and Durability
 March 9, 2026
 -
Installation Tips for Stainless Steel Hasps
February 28, 2026
-
Benefits of Using Hasp Locks for Security
 February 27, 2026
 -
Top RV Door Lock Security Features
 February 26, 2026
 -
Upgrading Your RV Door Lock System
 February 25, 2026